3. Customizing Keyboard Layout for Windows and Mac with QMK
How to flash dactyl manuform on Windows and Mac with QMK
3.1 ✨Instructions
This section uses QMK Toolbox, a GUI (graphical user interface) compatible with Mac and Windows. The QMK CLI (command line interface) is also compatible with Mac and Windows. But if you are not familiar with programming, you should follow this section instead.
QMK Toolbox currently does not support Linux. See Section 4 instead.
For troubleshooting with QMK Toolbox, see Section 9.1.
Text in this format and color refers to something you can click on.
Text in block quotes refers to text output from QMK Toolbox.
3.2 🪄QMK Configurator - Customize Your Keyboard Layout

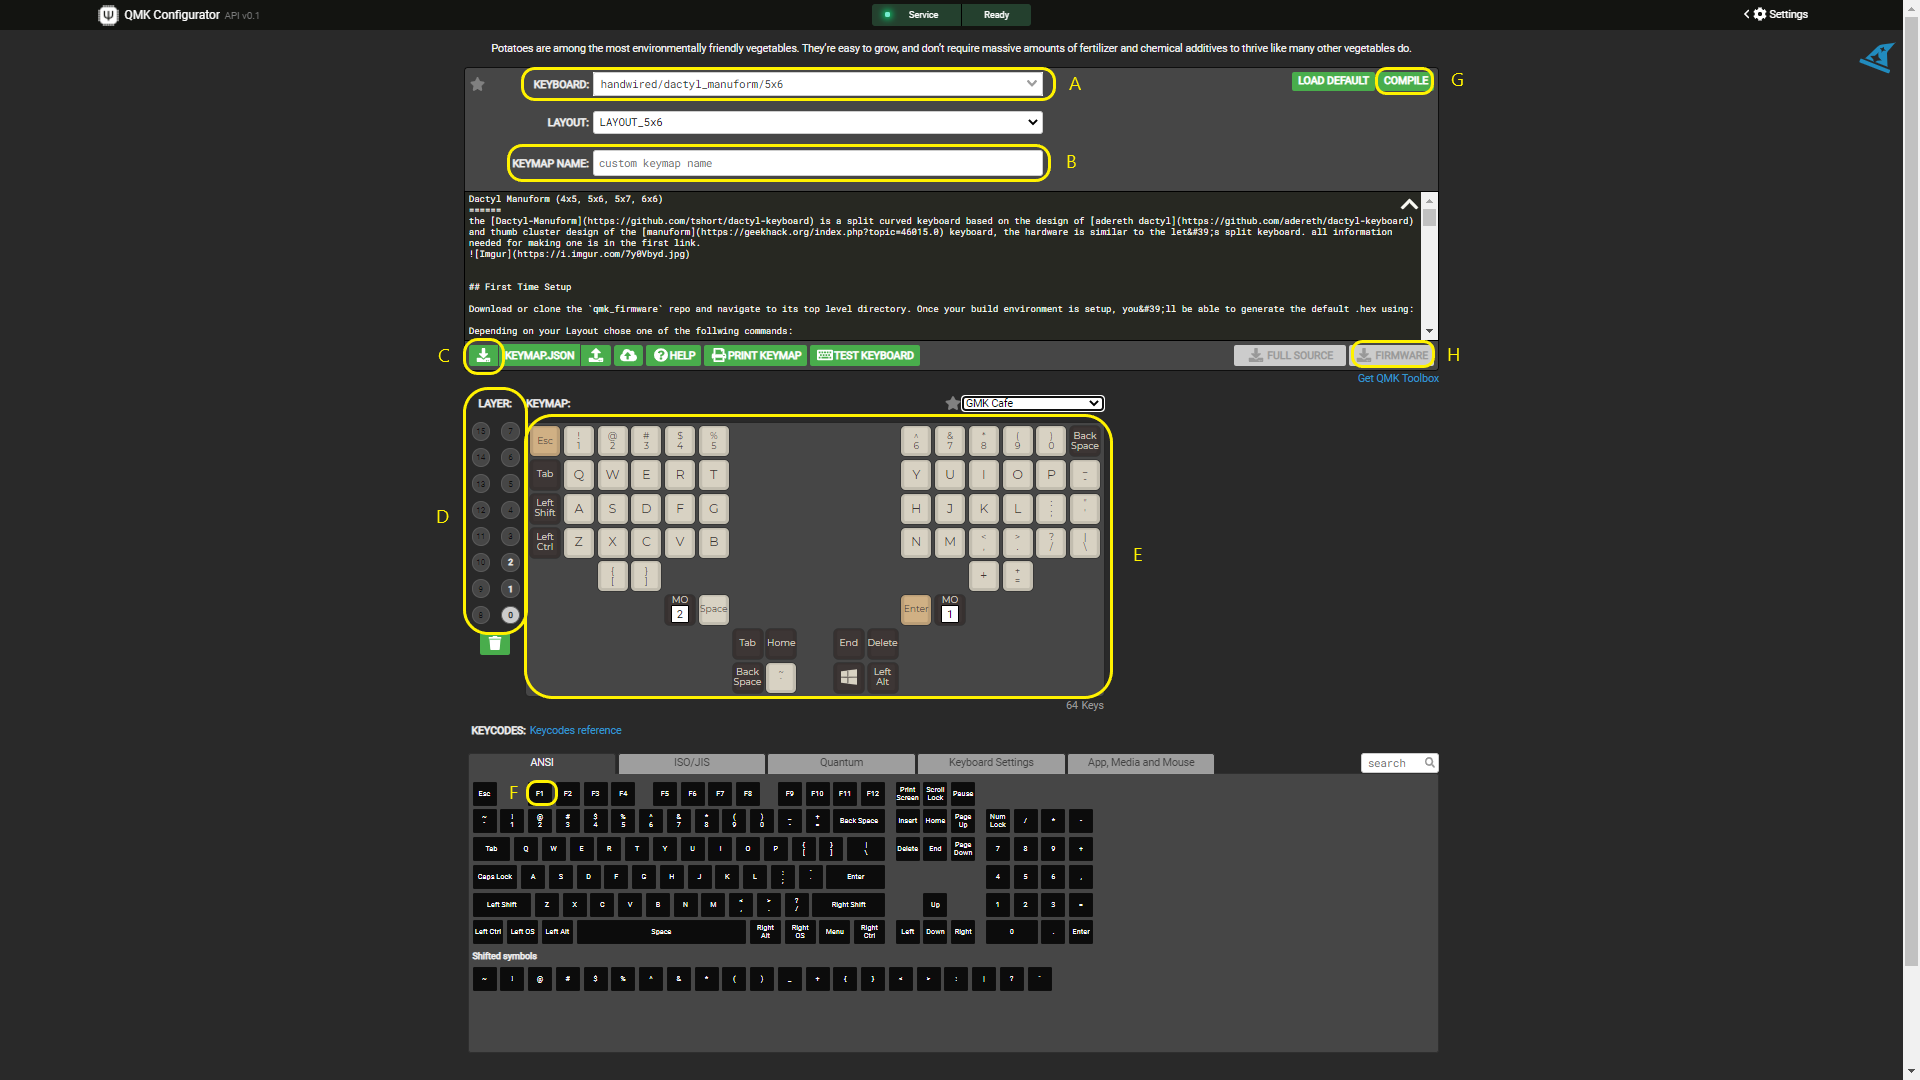
Navigate to QMK Configurator. Steps A to H in Figure 3.1 above refer to each step in this section.
Step A. Click the Keyboard dropdown. Select handwired/dactyl_manuform/5x6.
Step B. Enter the name you want to give your layout. For example, if you put my_keymap, QMK will later generate a file with the name handwired_dactyl_manuform_5x6_my_keymap.hex.
Step C. keymap.json - Save your progress (Optional)
If you're not fully done customizing your keymap, the keymap.json file is a way to save your progress. You can return to your save point by uploading the keymap.json file to QMK Configurator. Note that downloading the keymap.json file is optional and the file is not what you use to flash your keyboard.
Step D. keymap.json - Load previous save point (Optional)
As described in the previous step, this gives you the option to upload the keymap.json file to return to your save point.
Step E. This section in Figure 3.1 highlights the keyboard layout.
Step F. Try dragging the F1 keycode onto End on the keyboard layout. This changes that switch on the layout from End to F1. You likely won't want that button to be F1. Change it back by finding End in the keycode section and drag it to replace F1. Now that you're familiar with this, feel free to customize your keyboard layout.
The sections below refer to a specific QMK functionality called layers, which is not found in a traditional keyboard. If this is not important to you, feel free to skip to part G.
Layers - What are they?
Layers are a QMK specific functionality. The concept is similar to the Fn or FnLock key that is seen on some keyboards.
If you are coming from a traditional keyboard, the easiest way to understand layers is to interact with it. In Figure 3.1, Layer 0 is selected. Try clicking on layer 1, 2, or others. Clicking on a different layer will bring up a different layout.
Layer keys - What are they?
Pressing a layer key switches the layout a different layer.
1. MO(layer)
In Figure 3.1, the layer keys look like MO(1) or MO(2). This MO(layer) stands for momentarily activating the layer. This works similar to the Fn or Shift key on a regular keyboard.
If you used a keyboard flashed with the keymap seen in Figure 3.1, you must hold both "MO(2)" and "P" to get "Scroll Lock" on layer 2. As soon as you release the "MO(2)" key, it goes back to the original layer. Layers range from 0 to 15.
2. DF(layer)
DF(layer) stands for default layer. It is similar to the FnLock key seen on some keyboards.
Tapping this key switches your keymapping to the new layer until you decide to switch to a different layer by pressing another DF key.
Step G. When you are finished customizing your layout, click Compile. You should see a nice rotating potato baking in outerspace. Once this is done, the Download Firmware button should no longer be gray.
Step H. Click Download Firmware. It will download a file with a name similar to handwired_dactyl_manuform_5x6_your_keymap.hex. You will use this to flash your keyboard. You are ready to go to part 3.3.
3.3 🛠️QMK Toolbox - Download the Keyboard Layout Installation Tool

Step A. Go to the QMK Toolbox website. Check that you are looking at the latest release. In the photo above, the latest version was 0.3.3. The latest release as of this writing is 0.3.3. If you see a version with the name "Latest Beta", ignore it and scroll down to the next latest version.
Step B. Click to download qmk_toolbox.pkg if you use Mac.
Step C. Click to download qmk_toolbox.exe if you use Windows.
3.4 🛠️QMK Toolbox - Add Keyboard Layout to the Installation Tool
Open qmk_toolbox.pkg or qmk_toolbox.exe. If you are opening QMK Toolbox for the first time, you might see a dialogue box asking "Would you like to install drivers for your devices?". Select Yes.

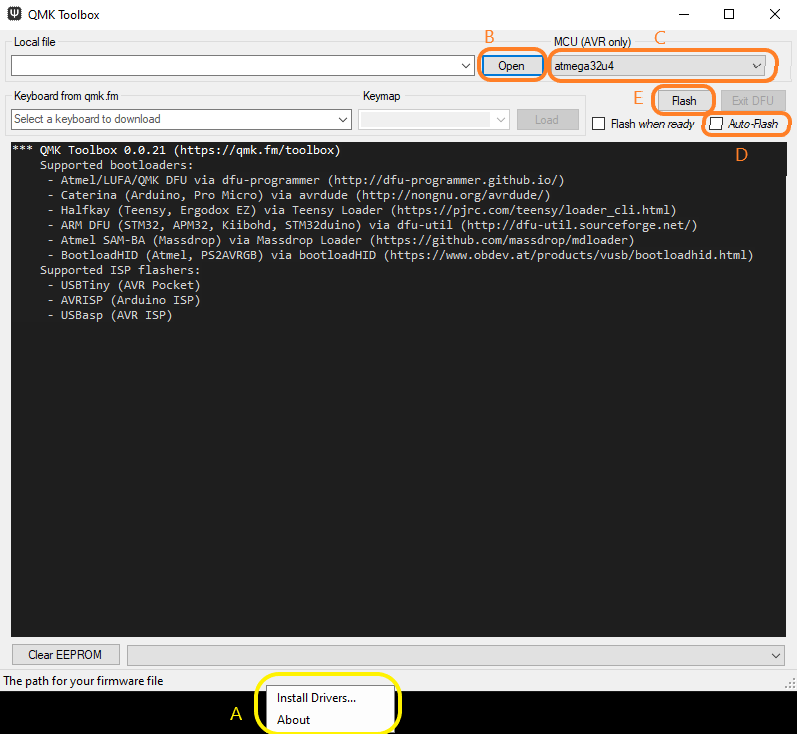
Step A. If this is your first time using QMK Toolbox on your computer and you did NOT see the install drivers dialogue box, go to Tool then Install Drivers. If you do not see it there, move your cursor to the whitespace at the bottom of QMK Toolbox, right click with your mouse and install drivers.
Step B. Click Open. Select the handwired_dactyl_manuform_5x6_your_keymap_name.hex file that was downloaded earlier.
Step C. Make sure the dropdown menu shows Atmega32U4.
Step D. Check off Auto-Flash. DO NOT click Flash just yet!
3.5 🖥️Keyboard - Install the Keyboard Layout
Step A. Before you click Flash, ensure:
Step B. Click Flash. The toolbox will wait for you as you perform the next step.
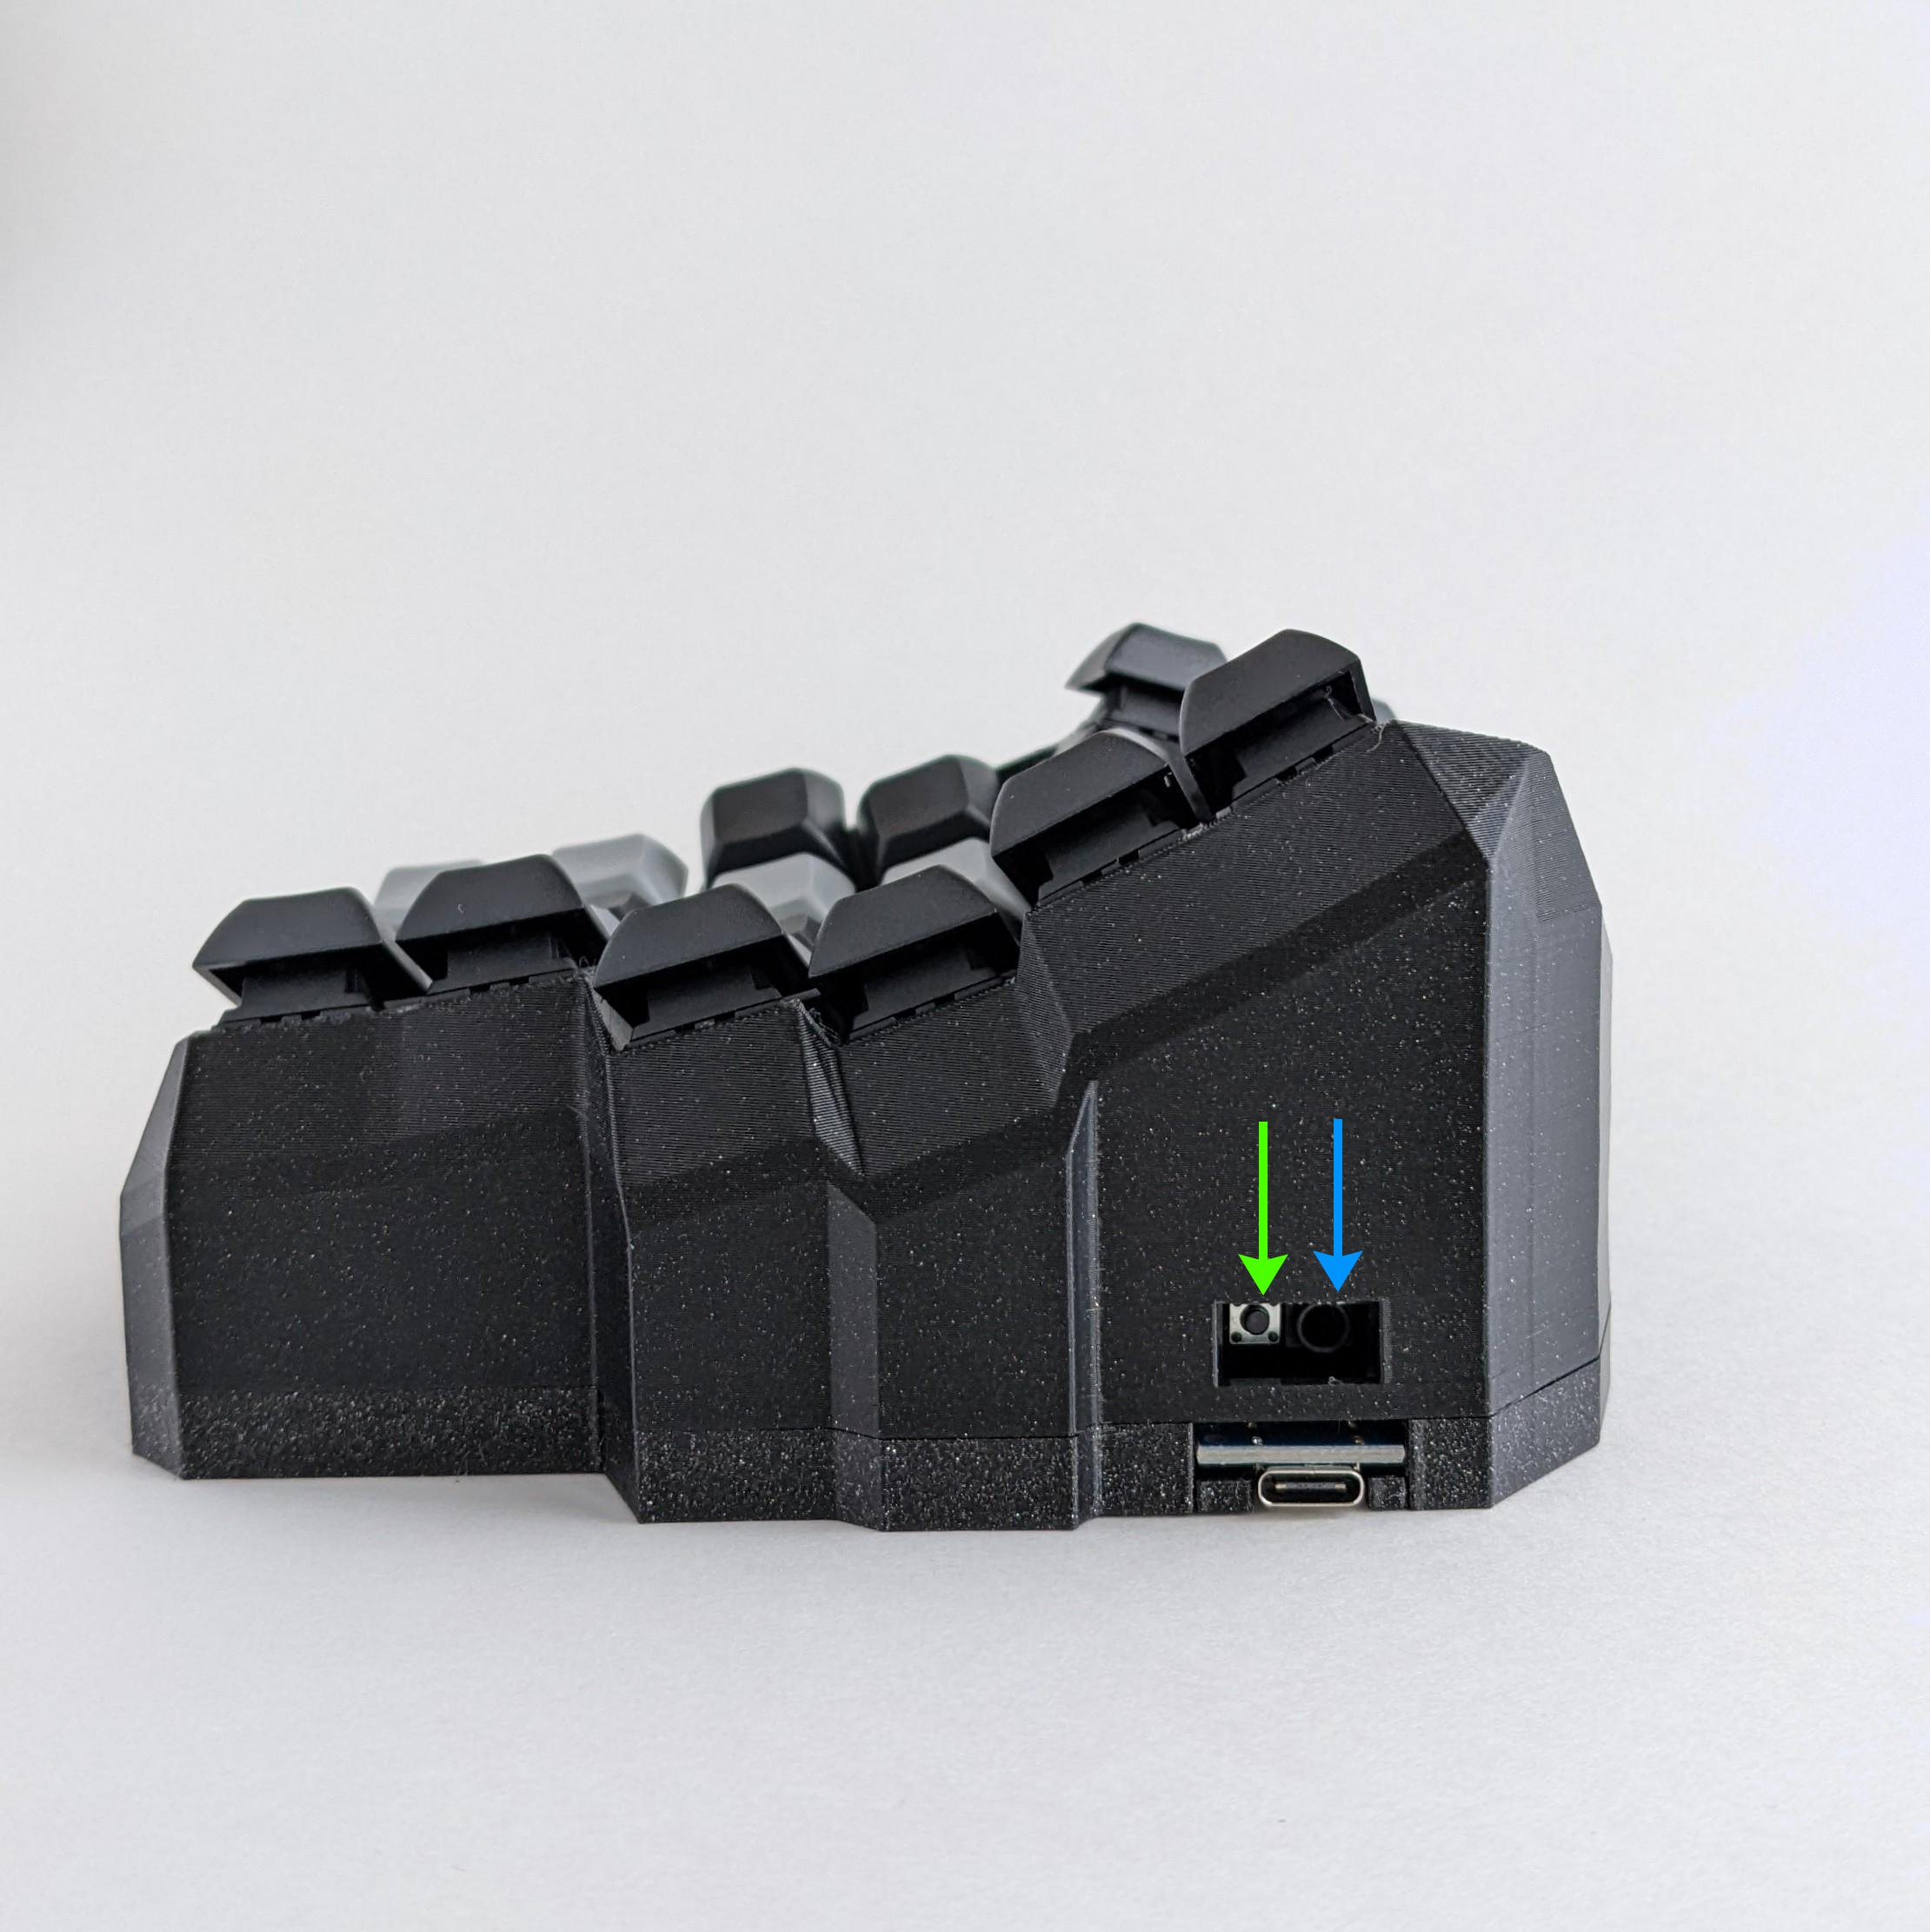
Step C. Click the reset button indicated by the green arrow in Figure 3.5.

If it flashes correctly, you should see the following.
Attempting to flash, please don't remove device
avrdude.exe -p atmega32u4 -c avr109 -U flash:w:"C:\Users\username\Desktop\firmware\qmk\windows\five\handwired_dactyl_manuform_5x6.hex":i -P COM6
Connecting to programmer: . Found programmer: Id = "CATERIN"; type = S Software Version = 1.0; No Hardware Version given. Programmer supports auto addr increment. Programmer supports buffered memory access with buffersize=128 bytes.
Programmer supports the following devices: Device code: 0x44
avrdude.exe: AVR device initialized and ready to accept instructions
Reading | ################################################## | 100% 0.00s
avrdude.exe: Device signature = 0x1e9587 (probably m32u4) avrdude.exe: NOTE: "flash" memory has been specified, an erase cycle will be performed To disable this feature, specify the -D option. avrdude.exe: erasing chip avrdude.exe: reading input file "C:\Users\username\Desktop\firmware\qmk\windows\five\handwired_dactyl_manuform_5x6.hex" avrdude.exe: writing flash (19424 bytes):
Writing | ################################################## | 100% 1.47s
avrdude.exe: 19424 bytes of flash written avrdude.exe: verifying flash memory against C:\Users\username\Desktop\firmware\qmk\windows\five\handwired_dactyl_manuform_5x6_five.hex: avrdude.exe: load data flash data from input file C:\Users\username\Desktop\firmware\qmk\windows\five\handwired_dactyl_manuform_5x6_five.hex: avrdude.exe: input file C:\Users\username\Desktop\firmware\qmk\windows\five\handwired_dactyl_manuform_5x6_five.hex contains 19424 bytes avrdude.exe: reading on-chip flash data:
Reading | ################################################## | 100% 0.16s
avrdude.exe: verifying ... avrdude.exe: 19424 bytes of flash verified
avrdude.exe: safemode: Fuses OK (E:CB, H:D8, L:FF)
avrdude.exe done. Thank you.
Flash complete
3.6 🖥️Keyboard - Repeat For the Other Piece of the Keyboard
Repeat section 3.5 for the other piece of your keyboard.
3.7 🥳Good Work! You Did It!🎉
Reconnect the two pieces with the audio cord. The sockets for the audio cord are shown by the blue arrow in Figure 3.4.
Connect the USB cord from the left keyboard to the computer.
Good work, you did it 🎉!
Last updated